
These Handy Tests Screen Your Mobility – Try Them at Home
Evaluating your range of motion reduces injury risk over time.

Picture the perfect running gait: You lean forward from the ankles, arms swinging back and forth to support your momentum, as your legs move in a full circle and your feet land gracefully, one at a time, then powerfully push off the ground.
To hit that strong stride, you need a full range of motion in the hips to allow for both proper flexion on the knee drive and adequate extension as the leg swings behind you. Your ankles—and even your big toes—must also be fully mobile to gain power from your push-off. Meanwhile, your shoulders need to rotate properly for an effective, relaxed arm drive.
Mobility is the active movement of a joint or muscle through its entire range of motion without restriction
If you have a poor range of motion (or lack of mobility) in any part of your running gait, you’re more likely to suffer from an inefficient stride and numerous potential injuries and imbalances. Rather than flexibility, which refers to passively going through a movement, mobility is the active movement of a joint or muscle through its entire range of motion without restriction or assistance from a tool or other person. Therefore, it’s no surprise that mobility is paramount for healthy and happy running. You use your entire body to run, so if one joint or muscle is immobile, it affects your entire gait.
That’s why, with the help of Kristopher Ferrara, a doctor of physical therapy who specializes in running injuries, Runner’s World put together a list of simple tests you can perform at home to check the range of motion in key areas of your running gait. Then, once you know the results, you can use the suggested exercises to bring your mobility back and break a recurring injury cycle.
Apley Scratch Test
What is it?
The Apley Scratch test assesses shoulder mobility. You might not think about the shoulders playing an important role in running, but strong and mobile shoulders promote good posture. And good posture—which ensures that your arms swing parallel to your body and that your chest remains tall and your spine straight—eliminates any wasted energy from side-to-side motion and allows for better breathing and more comfortable running.
Shoulder mobility is essential to cross-training, too, and everyday functional activities like putting on a shirt or reaching for something above you.
“Cross-training is good for runners. It helps decrease injury risk and will help improve your general performance, whether you’re just running recreationally or if you’re a high school, college, or professional athlete,” says Ferrara. So whether you hit the gym or the pool, good shoulder mobility ensures you’re making the most of your non-running gains.
How do you do the Apley scratch test, and how do you pass?
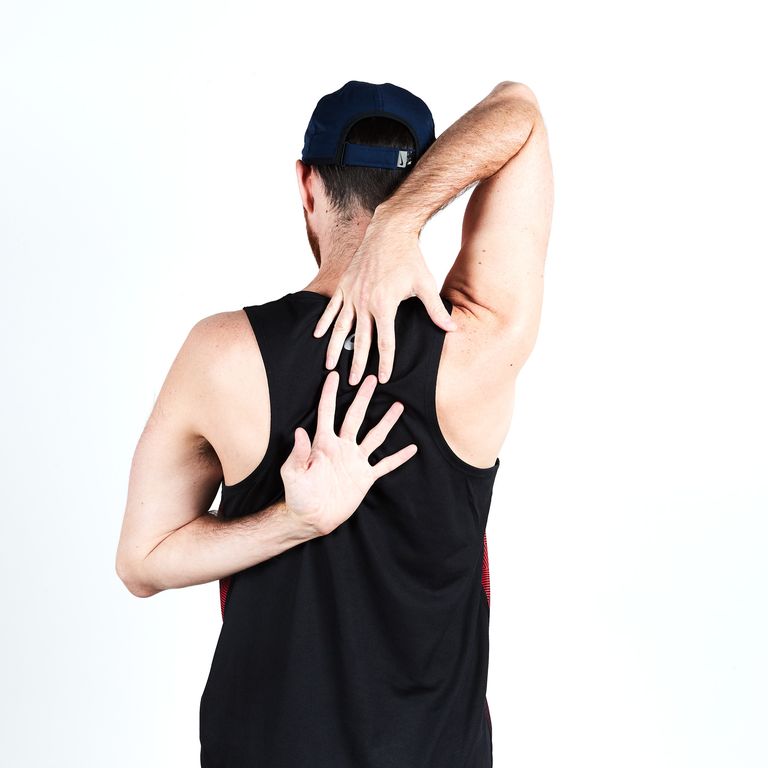
To perform the Apley scratch test, first, reach one arm over your head like you’re washing your hair, Ferrara explains. Slide the hand, palm facing in, towards the center of your upper back. This movement measures abduction (or moving your arm away from your body’s center) and external rotation. Reach the opposite arm behind your low back, then reach for the same spot as your other hand, palm facing out, like you’re reaching for a bra strap. This measures internal rotation and adduction (arm moving toward your body’s center). Hold, then switch arms and repeat.
Ferrara looks mainly for symmetry on both sides, making sure that both arms are able to internally and externally rotate. Each hand should be able to touch the center of your back without pain or restriction. If there is discomfort when touching the mid-back, or your hand can’t reach it, then you’ve failed the test.
How can you improve shoulder mobility?
If you fail the test, Ferrara recommends an overhead tricep extension stretch. Perform the upper half of the Apley scratch test and use the other arm to gently hold the elbow in place. Do that three times a day for a minute each, preferably after you’ve finished working out. After a few weeks of five to seven days of stretching, you should see improvement.
Thomas Test
What is it?
The Thomas test examines the hip flexor muscles. “[Tight hip flexors are] going to limit the amount of force and propulsive motion that you can use to go forward,” Ferrera told Runner’s World in a previous article. The hip flexors connect to the low back too, Ferrara says, so if they’re tight, they’ll compromise spinal positioning and affect posture. Bad posture decreases efficiency and increases injury risk.
How do you do the Thomas Test, and how do you pass?
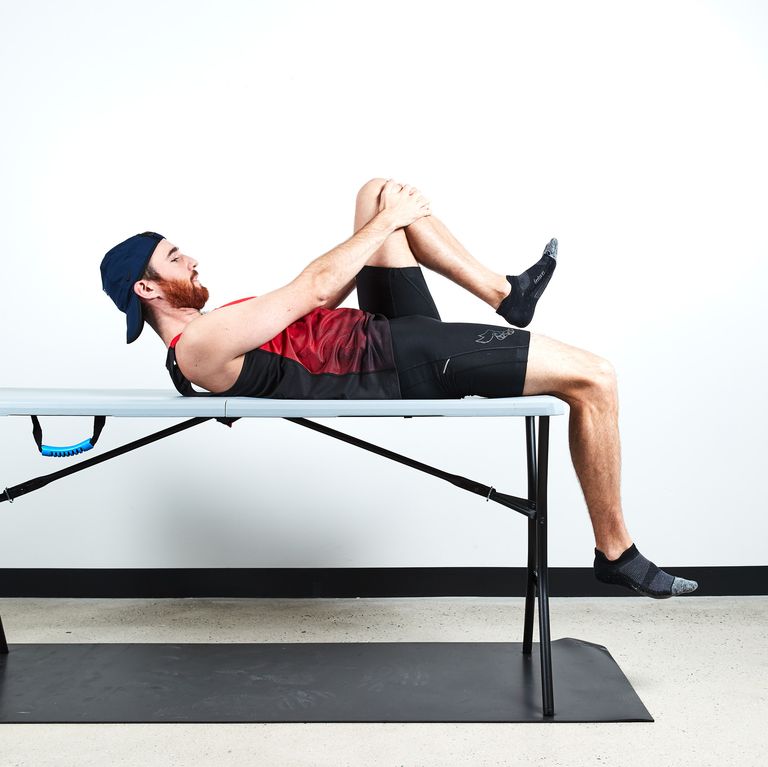
Lie faceup on the very edge of your bed or a sturdy table. Let your legs hang off. Bring both knees toward your chest so your back lies flat against the bed. While holding one knee close to your chest, slowly straighten the other leg and let it hang off the edge.
You pass the test if your back and the back of your lowered thigh is flat against the bed or table, and your hanging knee is bent at a 90-degree angle off the surface.
There are a few ways to fail depending on which hip flexor muscle is tight.
If your lowered leg extends out straight instead of bending at the knee, your rectus femoris (a.k.a. quad muscle) is tight. If your lowered knee is bent, but the back of your thigh is elevated off the bed, then it’s your iliopsoas (the group of hip flexor muscles). If your lowered leg is bent at the knee and your thigh is resting on the bed, but your leg hangs slightly out to the side, then your tensor fascia latae is tight—that’s the muscle that lies to the outside of the hip.
How can you improve hip flexor mobility?
There are a few simple stretches that target the hip flexors to improve mobility.
First, you can simply hold the Thomas test position, maintaining a flat back and thigh, pulling one knee into your chest, and keeping a 90-degree angle on the knee that’s hanging off the surface. Hold that for 30 seconds to a minute.
The second stretch is a kneeling lunge. Get down on one knee with the opposite foot in front of you. Lean forward as you squeeze your glutes, engage your core, and straighten your spine. Hold the stretch for 30 seconds to a minute.
You can also roll out the hip flexor area with a lacrosse ball or foam roller.
It’ll take some time before you see changes here—maybe eight to 10 weeks—says Ferrara, but just make sure you loosen those muscles five to seven days a week for a total of three minutes per day.
Ober’s Test
What is it?
Ober’s test evaluates tightness in the iliotibial (IT) band. According to Ferrara, IT band syndrome, which refers to tightness or inflammation in the tendon, is a common injury for runners.
The IT band, which is a ligament that extends from the pelvic bone to the knee bone, helps stabilize and move the knee joint. If the IT band is tight or inflamed, moving the knee hurts and makes running painful, ultimately limiting the mobility of your stride. Performing Ober’s test will tell you whether the discomfort or pain in your knee is due to IT band tightness rather than another ailment.
How do you do Ober’s Test, and how do you pass?
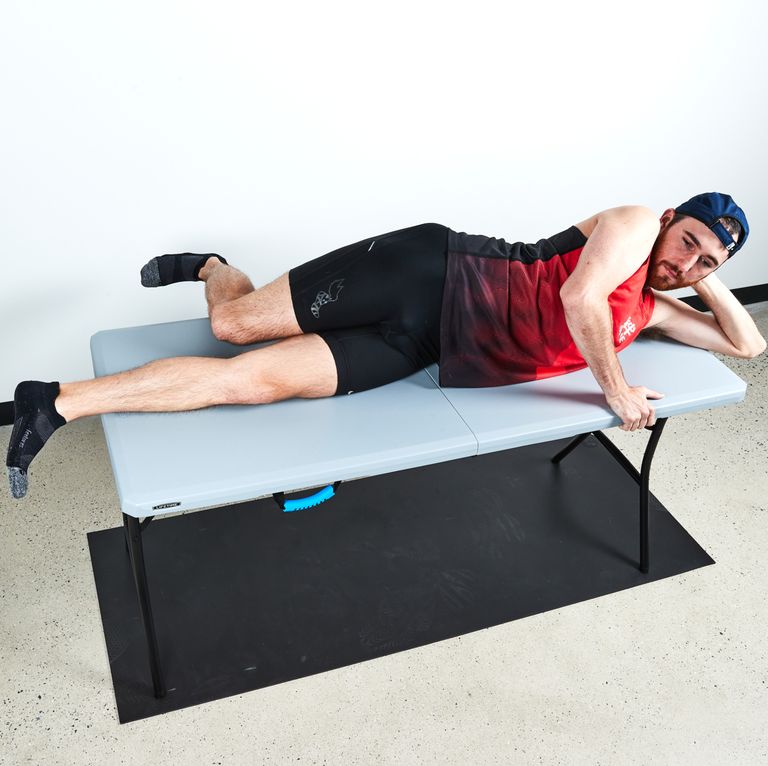
Lie on your side on a flat surface, with the affected leg stacked on top. Make sure the back and bottom leg are straight. Bend your top leg at the knee at a 90-degree angle. Stabilize your pelvis by keeping your hips stacked and not arching your back. (If you are not able to stabilize your pelvis, you may need a friend, partner, or physical therapist to hold it in place and perform the rest of the test for you). While maintaining the 90-degree angle, bring your top leg back behind you and let it fall to the surface. If it can’t touch the surface, or there is a pain in the knee or thigh, you have a tight IT band on that side. Repeat the test on the other side.
How can you loosen the IT band?
If the tight IT band is on your right side, stretch by crossing your left foot over your right while standing next to a wall on your left. Reach over your head like you’re forming a ‘C’ with your body and touch the wall. You should feel a stretch from your trunk down to your knee. Hold it for 30 seconds to a minute. Repeat on the other side.
Ferrara recommends consistently stretching over time to improve your situation. Therefore, add this stretch into your daily routine and you’ll see improvement in eight to 10 weeks.
Ankle Mobility Test
What is it?
The ankle mobility test checks the dorsiflexion of your foot—that’s your ability to bend your toes toward your shin. Dorsiflexion is key for “being able to roll the body over the foot into a smooth push-off,” says Ferrara. If you have limited ankle mobility on one side, then you won’t push off as powerfully when running, and other parts of your body overcompensate. You might experience overuse injuries, like IT band syndrome or Achilles tendinitis, as a result.
How do you do an ankle mobility test, and how do you pass?
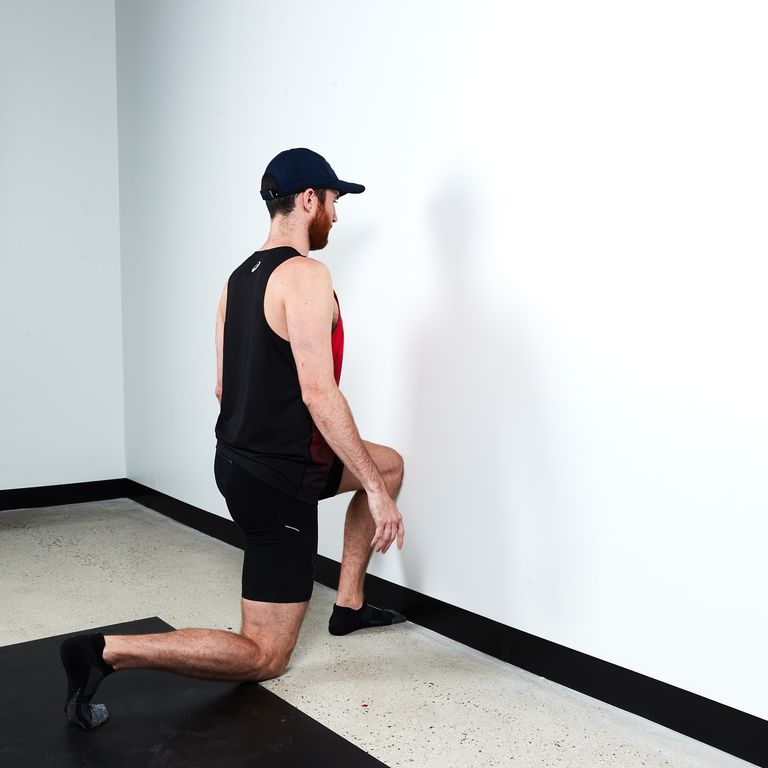
Stand facing a wall, with your right leg forward and toes against a wall. Your left foot should be far enough behind you that you can lower that knee into a kneel. Lower into a lunge to touch your right knee to the wall, while your left knee lands on the ground. To pass, your right heel should remain flat on the floor and your right knee should come directly over the foot.
Ferrara describes two types of failure. One, your knee can touch the wall but your heel pops off the ground. And two, you can’t touch your knee to the wall at all. In those cases, you’re likely suffering from tight calves or Achilles.
If your knee can touch the wall, but it falls to the inside of your body, then you’re overpronating in that foot. While it might look like a pass, Ferrara says your body is actually overcompensating for lack of dorsiflexion. “You might need to say, ‘Okay, well, I’m cheating,’” Ferrara says. “Make sure your knee is straight over your foot, you’re leaning forward, and you’re maintaining that position.”
How can you improve ankle mobility?
If you fail in one of the first two ways, then Ferrara recommends stretching the calf and Achilles, or foam rolling the calf. If you recently sprained your ankle, which is a common cause of limited ankle mobility, then you just need to let it heal before trying again.
Great Toe Extension Test
What is it?
The great toe extension test checks your big toe flexibility. It goes hand-in-hand with the ankle mobility test because they both affect push-off in your stride. “When you’re pushing off the foot, you’re going to get some toe extension as you go forward. If the toe isn’t able to expand or extend adequately… it’s going to put pressure up and down the kinetic chain,” says Ferrara. Non-flexible big toes can lead to a number of injuries, but Ferrara specifically names shin splints.
How do you do the great toe extension test, and how do you pass?
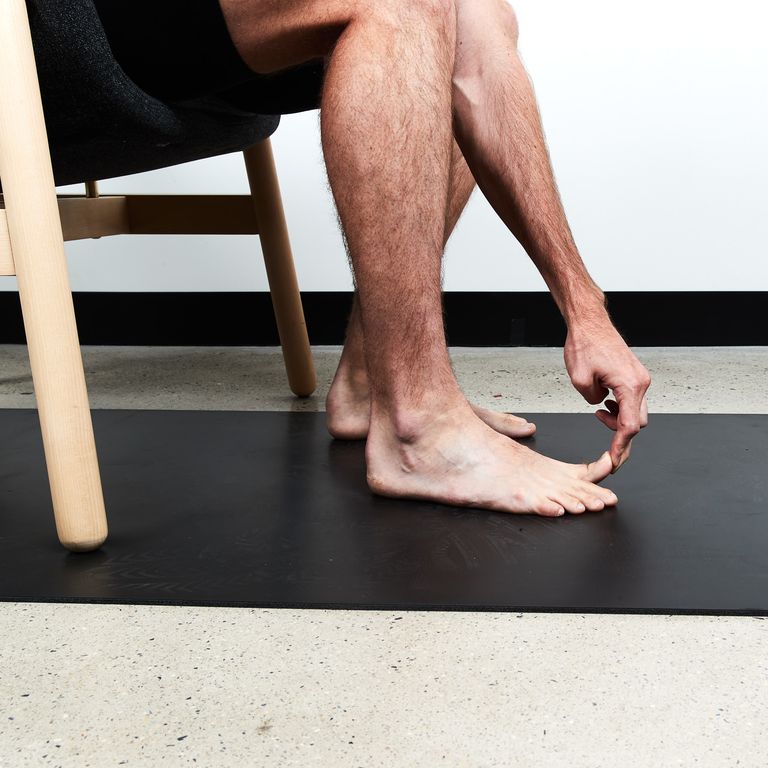
Sit on a chair or a mat and take off your shoes and socks. Put your feet flat on the ground in front of you. Scoot forward until your knees are over your ankles. Have someone, whether a partner, friend or physical therapist, lift your toe off the ground and try to point it towards the ceiling. Ferrara says you generally want to see it extend 20 to 30 degrees.
How can you improve big toe mobility?
In this case, the test is the stretch. Simply flex your toe for 15 to 30 seconds, take a rest, and repeat three to five times. Like the other stretches mentioned, it could take a few weeks to fully adjust, so stretch the toe five to seven days a week.
“It sounds weird to say, but we do a lot of big toe tests. It’s got a lot of implications. The big toe is really what helps you balance throughout the running gait,” says Ferrara.
90/90 Test
What is it?
The 90/90 test measures hamstring length during hip flexion (when the knee drives up toward the chest). Having flexible hamstrings is necessary for efficient running form. After pushing off your foot, you drive your leg back, then pull it forward as your hip flexes and the knee comes up. The higher your knee comes, the more force you can push down into your step and toe-off. If your hamstring is shortened, it directly affects your amount of hip flexion, and subsequently the force of your next push-off.
How do you do the 90/90 test, and how do you pass?
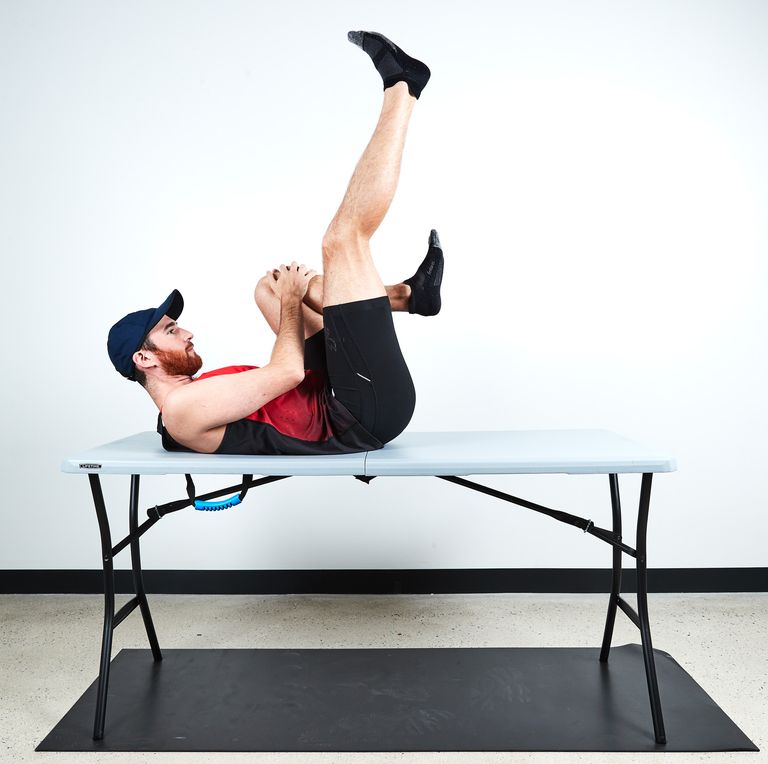
Lie face up on a flat surface. Bring your knees up to create a 90-degree angle at your hips, and bend your knees at a 90-degree angle. While maintaining that 90-degree angle in your hips, try to straighten your leg from the knee, extending your foot toward the ceiling.
Generally, normal is 30 degrees less than a completely straight leg, says Ferrara. So, if you can’t straighten your leg all the way—which would be 180 degrees—you pass as long as you hit at least 150 degrees.
How can you improve hamstring mobility?
Ferrara recommends foam rolling the hamstrings. You can also simply perform the 90/90 test on one side, hold it for 30 seconds to a minute and then switch sides.
As with the previous stretches, you have to consistently stretch five to seven days a week for a few weeks to see noticeable improvement.
READ MORE ON: flexibility mobility