9 Killer Core Moves For Full Body Strength
This nine-exercise routine stretches and strengthens your body from your neck to your knees – improving your posture, and in turn, your running.

Do you have a weak core? Take these two self-tests to see if you’d benefit from this routine.
HEAD UP
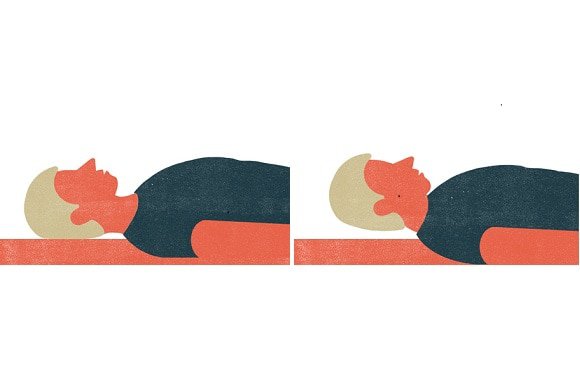
(A) Lie on your back with your head resting on the floor and your arms relaxed along your sides. Tuck your chin towards your chest until you feel a gentle stretch in the back of your neck, but make sure the muscles in the front of your neck remain relaxed. “The goal is to find a neutral position, which is different for everyone,” says physical therapist Merrill.
(B) Then, lift your head less than 3cm off the floor, keeping your chin in the same tucked position it was in when your head was on the floor. Hold for 10 seconds, then relax back down to the floor. Do one set of 10 to 15 reps.
What it does: Activates the front of the neck, while lengthening and relaxing the back of the neck – which neutralises the improper neck curve and restores normal balance between front and back. “Learning to keep your head neutral makes breathing easier,” says Merrill, “and decreases upper-body fatigue.”
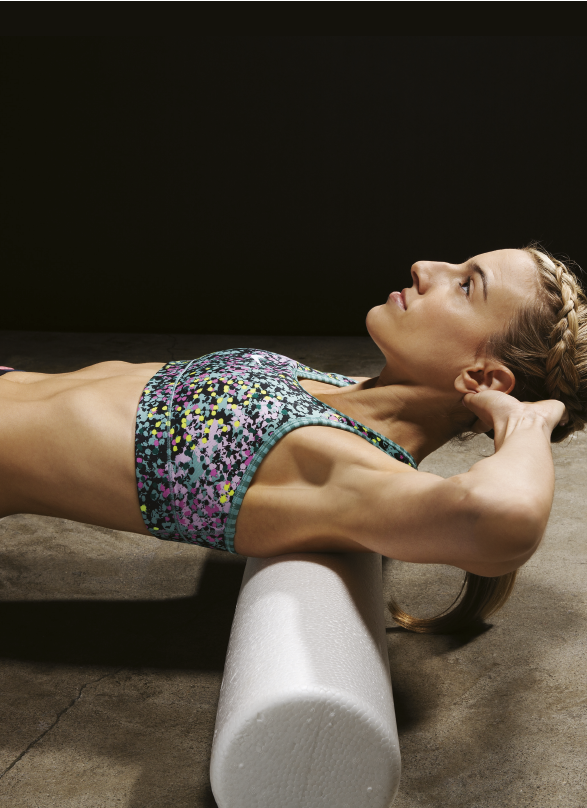
THORACIC SPINE MOBILISATION
(A) Lie on a foam roller positioned at your mid-back, perpendicular to your body so that you and the roller make a ‘T’, with your hands behind your head to support your head and neck, engaging your abs so your lower back doesn’t arch.
(B) Use your feet to move your body slowly up and down the roller without going past the base of your neck or the bottom of your rib cage. While keeping your head supported, encourage your mid-back to bend in the reverse of its normal, forward curve. Roll for 1 to 3min.
What it does: Opens and mobilises the thoracic spine (upper to mid-back) and ribs to counter their tendency to round forward. This helps with respiration, and with the spine’s ability to rotate, by loosening tight muscles and allowing the spine to be in a more neutral position. “The move helps your arms to swing opposite your legs during your running stride to counter the lower-body torque, which allows for spinal rotation,” Merrill says. “If your upper body can’t rotate well, the energy created by your lower body gets stuck and can create overuse injuries in your lower back, hips, knees, and/or lower leg.”
Scapular Wall Slide
(A) Stand against a wall with your legs straight and feet shoulder-width apart. Lay your arms flat against the wall so they and your head make a ‘W’ shape. Keep your neck muscles (upper trapezius) relaxed to allow your lower trapezius to do most of the work.
(B) Slide your arms up the wall while straightening them as high as you can without tensing your neck.
(C) Slide your arms back down. Do as many as you can without losing form (roughly 10 to 20).
What it does: Strengthens the lower trapezius while opening your chest to minimise rounding forward and hunching your shoulders up to your ears. This also allows for better respiration and encourages a more efficient and powerful arm swing.
STIFF-LEGGED DEADLIFT
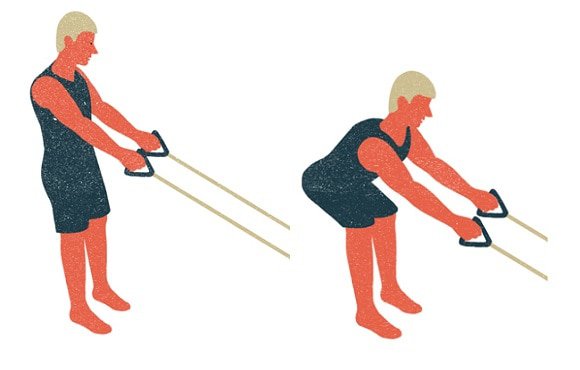
(A) Anchor a medium-tension cord around something stable at about ankle height. Hold the handles of the cord in your hands while facing where the cord is anchored.
(B) With a slight bend in your knees, engage your glutes to stick your sitting bones back as you lean forward, reaching your arms out in front of you. Come back to starting position while keeping weight on your heels, maintaining a flat back and concentrating on using your glutes and hamstrings to bring you to standing. Make sure not to bend your arms to bring yourself back up to standing; rather, focus on firing your backside muscles. Repeat until fatigue compromises form.
What it does: Opens the front of your hips (psoas, hip flexors, abdominals, iliacus) while it fires the back of the hip area (glutes, hamstrings, lower back). “This is a powerful length and strength exercise, for hamstrings in particular,” says Sam Iannetta, a personal trainer.
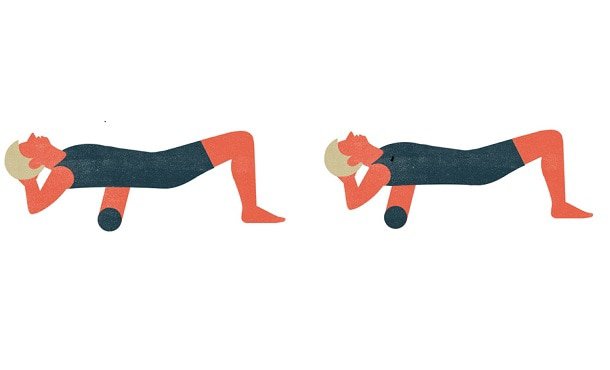
CHEST OPENER
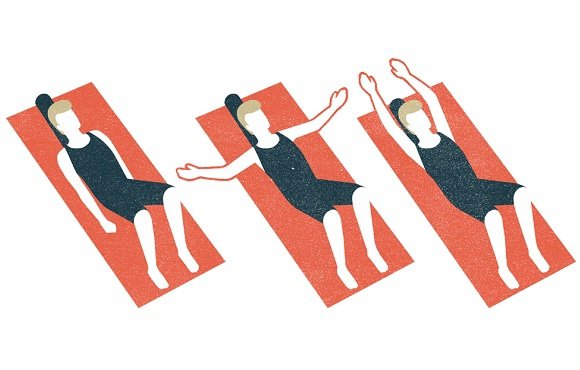
(A) Lie on a 900mm-long foam roller lengthwise, so that the roller lines up with your spine and your head rests on one end. Keep your knees bent and in line with your hips, with your feet flat on the floor, and engage your abs so your lower back doesn’t arch and rise off the roller. (Using your core also ensures you’ll get the best possible stretch in your shoulders.) (B) Reach your arms out to the sides and relax them so they fall as close to the floor as possible, keeping your elbows bent. (C) Move your arms up and down the sides of your body (like you’re doing a snow angel), breathing deeply and holding any particularly tight spots for a few extra breaths. Be sure to keep your lower back flat on the roller. Spend three to five minutes doing this and notice gravity encouraging your forearms closer and closer to the floor. “The goal is to get your forearms flat on the ground through the whole range of arm movement,” says physical therapist Merrill.
What it does: Stretches lats (latissimus dorsi), anterior ribs, pectorals, anterior deltoids, and nerves that travel into your arms. This helps you minimise the forward rounding of your shoulders, which in turn creates a better arm swing, improved bloodflow into the arms, and less upper-body fatigue, pain, and stiffness. Runners who hold tension in their shoulders and upper back should find relief with this exercise. It also has the largest benefit for respiration.
PELVIC THRUST HIP STRETCH
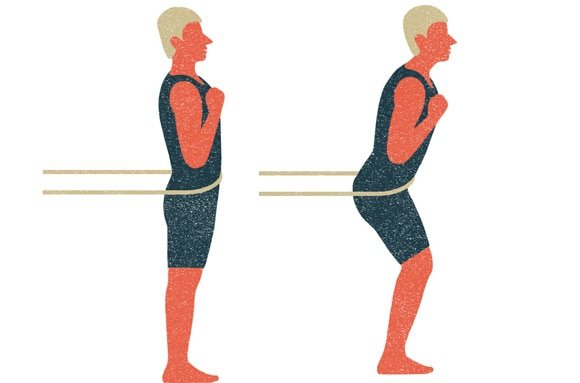
(A) Anchor a closed-looped, medium-tension cord around something stable at about waist height. Step through the cord and rest the loop on your hip bones. (You can also use the same low-tension cord you’ll use in the Upper W wrapped across the front of your waist to create enough tension.) Start with your feet shoulder-width apart and knees slightly bent, facing away from where the cord is anchored. (B) Lower to a squat by sticking out your sit bones and keeping your lower back flat. Then stand up straight, doing a slight pelvic thrust at the end of the motion to feel a stretch in the front of your hips. Repeat until fatigue compromises form.
What it does: Strengthens the gluteus muscles, hamstrings, and hips while opening and stretching the hip flexors, the front side of the psoas, and the iliacus. “This is a good counter to extended periods of sitting, which can shorten and tighten hip flexors,” says Iannetta. “This move allows the hips to settle into a more neutral position.”
THE FOUNDER

(A) Start with your feet shoulder-width apart, knees slightly bent. Push your hips back behind you while keeping your knees in line with your feet (and not too far forward). Lean your trunk slightly forward – you want your trunk at a 45-degree angle from your quads. (B) Keeping your lower back flat and still, raise your chest by using your upper back and ribs. Keep your abs and glutes tight to prevent your lower back from arching. Your chin should also stay gently tucked so your neck is neutral. (C) Put your weight fully on your heels while you lift your chest, open up your shoulders, and raise your arms above your head. Hold that position for a breath or two. (D) Release your arms so they’re slightly behind your hips. Take a deep breath and hold for 10 seconds; repeat five to 10 times. “The basis of the Founder is learning to stretch and then integrate the posterior chain of muscles,” says Foundation Training creator Eric Goodman.
What it does: “This move decompresses the spine and anchors the pelvis to create a stable base,” says Goodman. “When your torso can rest on that stable base, you start to run very softly, quickly, and efficiently.”
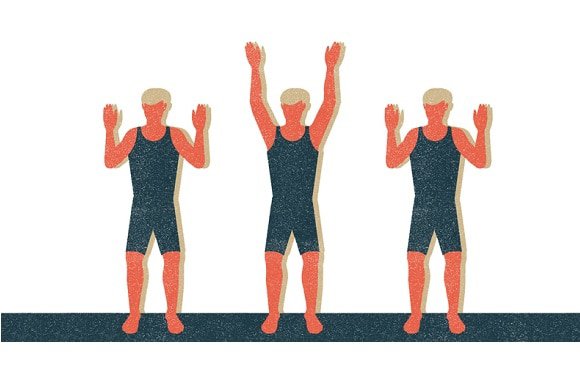
UPPER W
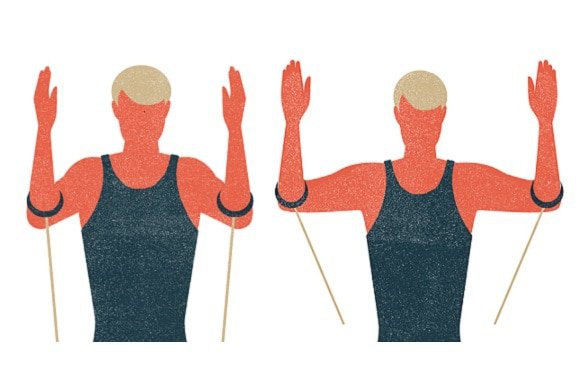
(A) Slide your arms through the handles of a low-tension cord that’s anchored high enough to allow the handles to rest in the creases of your elbows. Stand with your knees slightly bent and your feet shoulder-width apart. Start with your palms facing each other, and your arms making a 90-degree bend at the elbow. (Focus on keeping your shoulders down and away from your ears, and keeping your hands and elbows in a perpendicular line to the ground.) (B) Breathe in and pull your arms back so that your arms and head make the shape of a W, with your elbows at shoulder height, keeping your forearms at 90 degrees. Hold for two seconds, breathe out, and release with control. Repeat until your form begins to deteriorate.
What it does: “Opening the muscles in your chest,” says personal trainer Iannetta, “and engaging the postural muscles in your back, helps you stand more upright and adds space to the diaphragm and abdominals .”
OVERHEAD SQUAT
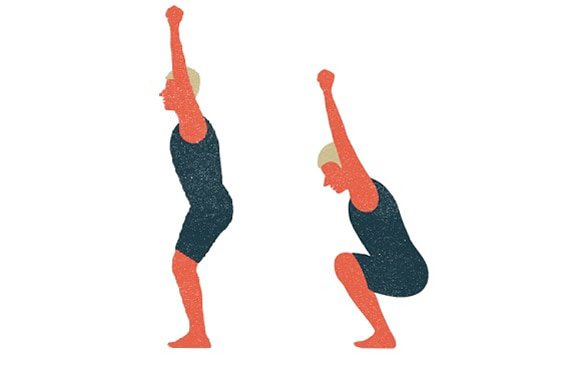
(A) Stand with your heels shoulder-width apart, toes pointing slightly out. Your arms should be overhead, just behind your ears, in a ‘Y’ position with thumbs pointed back. Stick your butt out so your trunk leans forward slightly. (B) Squat as low as you can by bending your knees, while sticking out your sit bones and keeping your lower back flat. Drive out your knees so they line up over your feet, keeping your feet planted and only slightly toed out, if needed. If looking from the side, your hands should be directly above your feet at the bottom of the squat (thighs just below parallel to the ground). Stand up by straightening your knees and then driving your hips forward, keeping your weight on your heels to engage your glutes. Do as many repetitions as you can without losing form.
What it does: “This movement uses muscles from your feet to your chest and neck, and demands that all the muscles work through a large range of movement to control body position,” says physical therapist Merrill. “When we can’t do an overhead squat with good form, we have mobility, stability, and/or strength limitations that will negatively affect our running and make us more prone to breakdown.”
READ MORE ON: core strength strength-training